Collanos in the Media

Collanos Press Releases
Collanos Blog
Collanos Forum
User Quotes
I believe that Collanos is a great tool for us to be able to keep all our documents synchronized between the various departments.
— Soh Choon Wai, United Kotak Berhad, Malaysia ![]()
Create Workspace
To create a workspace you first need to enter some general information about your workspace.
- In the tool bar, click on "Create Space".

The "Create New Workspace" wizard opens.
- Enter the Name and Description of your workspace and then click on the "Next>" button.
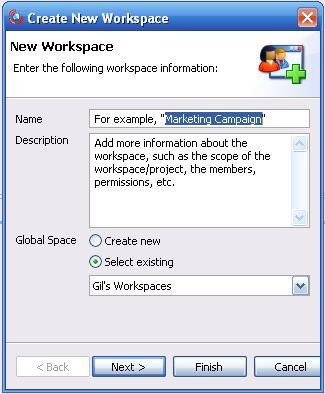
The next step of the wizard opens.
Notes:
- You can skip one or more steps in the wizard by clicking on the "Finish" button. Later on you will be able to invite members to your workspace and add folders and content.
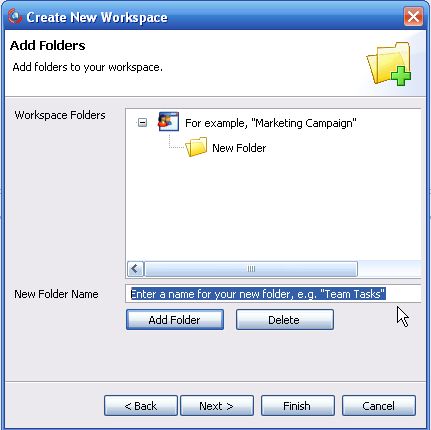
Adding Folders
Once you entered the general information of your workspace, you can proceed to add folders.
- Add a new folder to your workspace by entering the name and then clicking on the "Add Folder" button.
Notes:
- You can repeat this step to add multiple folders.
- You can also skip this step and add more folders or sub-folders later on, upon exiting this wizard.
- If you want to delete a folder you just created, highlight it with your mouse and then click on the "Delete" button.
The new folder/s are displayed in the structure.

- Click on the "Next" button.
The next step of the wizard opens.
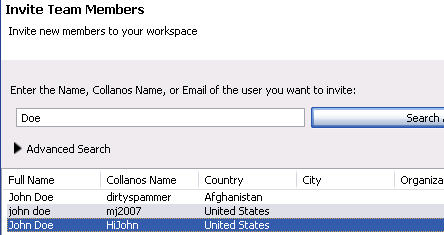
Inviting Members
At this point you have created the workspace folder structure and can now invite members to your new workspace.
- Invite members by searching for them in the Collanos directory and then inviting them to your workspace.
Enter the name, email address or organization of the member you want to invite and then click on the "Search" button.

Notes:
- Member must have registered with Collanos (i.e have a CollanosName) in order to be invited to your workspace.
Search results are displayed.
- Highlight the name of the user you want to invite and click on the "Invite" button.
Notes:
- Repeat this step to invite multiple users to your workspace.
A list of one or more members to be invited are displayed.
Notes:
- If you want to remove a name you just added, highlight it with your mouse and then click on the "Remove" button.
- Click on the "Finish" button.
Your new workspace is created and displayed in your Active Workspaces view.

Notes:
- Once the user accepts the invitation, the Pending status will change along with the grey color of the icon.
- When searching/inviting Collanos members in the directory, you will NOT be able to locate yourself or any other member in the currently active workspace, as you are already members of that workspace.
Adding Content to Your Workspace
Once you have created the folder structure and invited members to your workspace, you can start adding content.
Content can be in the form of files (or "File Objects") that already exist on your computer, such as MS Office documents, PDF files and images, or Collanos Business Objects.
Collanos Business Objects allow you to create structured content with additional features. Currently, these objects include: "Notes", "Discussions", "Tasks" and "Links".
To learn more about these Business Objects, see: User Guide: Object Types.
Note:
- Content can also be added to your workspace prior to inviting members.
- To add a new object to your workspace, highlight one of the folders and then click on one of the object icons in the tool bar.

Each object triggers its respective dialog window, prompting you to enter or select information related to that specific object-type.
For example, selecting the "Add File" icon prompts you to select a file from your computer.

- Enter the required information or select the file you want to add to your workspace.
The new object is added to the folder.

You have completed the four main steps on how to create a workspace.
To learn more about workspace features and functionality, see: User Guide: Workspaces.
Related Tasks: